 So, do you remember a few weeks ago, I promised you a little bit of something new? Well, here we go. I had planned to start really small – you know, a photo frame here, a pillow case there, but the little dresser I mentioned? Well, it cried out for some paint, and after I found the knobs, it was only a matter of time.
But, I’m getting ahead of myself. I had many plans, lots of them not very practical with my limited skillset. I had dreams of a stencilled tree or something across the front, perhaps chevrons (the internet loves chevrons), or possibly painting the whole thing a sunny yellow? But since this little guy was destined for my bedroom (which I share with my lovely husband), none of these really felt like the right thing to do. And so we waited.
And in the interim, we went away on a trip (did you know that Joburg is extremely cool? It is.) And on our way back (we drove), we stopped off at a small roadside shop called the Bali Trading Co., just outside of Riversdale. We’d been in the car for two days, and we needed a rest stop; a place we’ve sped past half a dozen times and never looked at twice. And while I waited for hubs to finish in the loo or buying biltong or something, I browsed around. First I spotted a cushion cover I wanted, but the queue was dissuasive. I looked around to see if there was anything else I could get to make it worth waiting in this long queue.
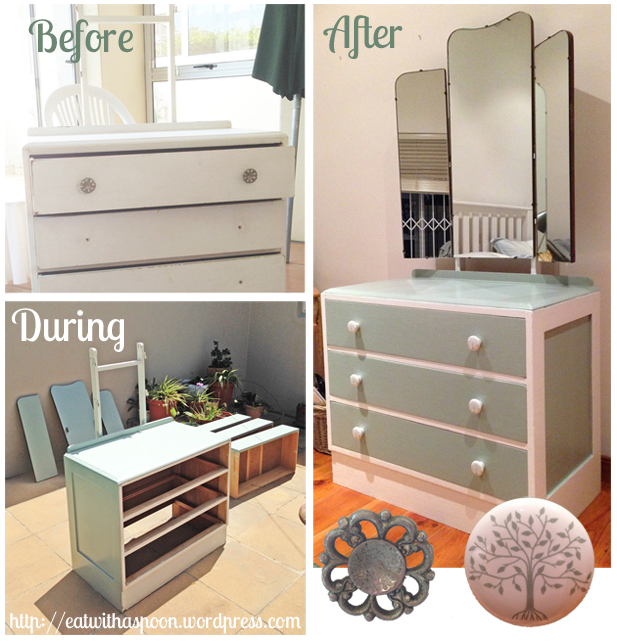
There they were. Tucked in a corner with a heap of buttons and other bric-a-brac. The porcelain knobs. The same pattern came in a couple of colourways – more blue, more gray – but these greeny-gray ones just seemed right. And I was sold. So were they, for that matter.
The next few weeks were busy, but as soon as I could, I got to work. I decided to colour match the paint colours to those on the knobs, with the dark colour behind the white knobs on the drawer fronts to make them stand out, as well as on the top so it won’t look dirty too quickly. With white accented edges, we were away. Paint was bought, my in-laws stepped in and sanded it down (no, I didn’t ask them to, and yes, I was a bit miffed. But what was done, was done), and this past weekend I spent my time covered in paint.
The dresser has a wooden frame and wood panelled sides. It’s not completely solid wood, and it had been painted quite a few times before. The current white looked quite the worse for wear. Anyway, here’s how I did it.
Ingredients:
Paint (I used an oil-based furniture paint)
Foam roller (disposable)
Paint tray
Aluminium foil
Small detail brush (a foam brush would be great too, for easier clean up and a smoother finish)
Newspaper or drop cloths
Method:
- Take off any hardware, and sand down the entire piece. Remove the drawers, and sand down any lumpy or pocked parts. Smooth any rough edges, but also sand away any shiny surface of the previous coat of paint. Sand off any old paint drips, and smooth off the edges of the drawers if they do not slide in and out easily.
- If there are any serious knocks or dings, use paintable wood filler to fill them neatly and smooth it off with a scraper. Sand those down too, once they are dry. My dresser didn’t have any holes that I was worried about, but this is a useful step if yours is more knocked about and you want a perfect finish.
- Prep your painting area. Sanding is messy, but can be swept up easily. Paint, especially oil-based paint, is sticky, and hard to get off. Paint in a well-ventilated area, out of direct sunlight but with enough light to see. Put down newspaper or drop cloths, making sure to cover the area well.
- Stir your paint with a stick, making sure any separation is well-integrated before you pour it out.
- Cover your paint tray in foil, being careful not to tear it. This makes clean up a LOT faster, and I really valued having read this on a tutorial once.
- Pour out a little of your paint into the tray. The more you pour, the more you stand to waste if you have to stop, so just pour a little at a time, filling up as you need.
- Roll your foam roller into the paint, and roll it a few times on the raise, lumpy part (that’s a technical term) to get some off. You want even coverage, but not loads of paint flicking and slopping all over the place.
- Paint the item, being careful to go with the grain, and take thin, even strokes. Know that you’ll probably have to do more than one coat for a perfect result, so don’t stress too much if the coat isn’t perfect.
- Paint all the areas of one colour first, so you don’t have to keep two colours of paint out. I did the drawer fronts, the mirror backs, and the top and side panels with the darker colour first.
- Leave those out to dry (my first coat took maybe an hour outside in the wind and sun). Have some lunch.
- When the first coat is dry, paint the second coat. Two was enough for this piece, but depending on the previous finish of your piece, and what colour it was beneath and what colour you are painting it, you may need a third.
- I left this overnight, and allowed it to dry fully and properly, before I went for my second colour, the white areas.
- Use the same technique for the white areas, taping off any areas using masking or painters tape where you do not want the colour to go over the first colour. I couldn’t find my tape, so I had to do this freehand, which took a lot longer. Do as I say, not as I do, folks.
- Leave to dry for an hour, or until it’s not tacky to touch, and do a second coat.
- Leave overnight to dry, pop on your new hardware, and take loads of photos for Instagram and Twitter.
So that’s how I tackled this beast, and I’m super, super pleased with the outcome. Next stop world domination, right? Have you tackled any projects you were super pleased about? Or done something completely out of your comfort zone? My next project is a little bookshelf, with a whole range of new problems. Can’t wait to see how that turns out!
