one cup homemade granola

So, I asked on Twitter this morning if you want my homemade granola recipe, and the response was good, so here goes. I tried MANY different recipes before settling on this, and it’s really more of a method than a hard-and-fast recipe, which I think is easier and more flexible anyway.

INGREDIENTS

One cup each:

  • Oats – old-fashioned/rolled (not instant)
  • Coconut – flaked, desiccated, ground
  • Nuts & seeds (roughly chopped, if large) – whatever you have or that strikes your fancy
  • Dried fruit (roughly chopped, if large) – again, whatever you like

1/3 to 1/2 a cup:

  • Coconut oil
  • Honey (or other liquid sweetener)

And:

  • A pinch of salt
  • 1 tsp cinnamon

Optional:

  • A sprinkle of protein powder
  • A spoon of cocoa/cacao
  • 1 tsp vanilla

METHOD

  1. Preheat your oven to about 150ºC. This is a low-and-slow recipe, don’t be tempted to turn the heat up to speed things up (I did once, and it wasn’t pretty). If your oven has the option to choose the element, choose the bottom one, and turn off the fan.
  2. In a large mixing bowl, measure out your dry ingredients (except the fruit) and mix them up.
  3. Melt the coconut oil and honey so they are both liquid (I do it in the microwave, but you do you).
  4. Pour the melted oil and honey in and mix it up. You’re looking for a slightly sticky consistency, and for all the mixture to be covered. If it’s not yet covered, melt a little more and mix that it until you get your desired consistency.
  5. Add the salt into the mix now, to keep it from being far too sweet, and add your cinnamon. If you are using any of the optional ingredients, now’s your moment.
  6. Pour into a dish* and pop it into the oven. Take it out every 15-20 minutes to stir and check the colour.
  7. Add in the dried fruit when you are about 10 minutes from done – just sprinkle them on top and stir into the mixture.
  8. After about 30-45 minutes or so, it should be sticky, clumping up and golden – that’s when I take it out.
  9. Keep stirring it while it cools – the less often you do so, the larger the clumps (and the more likely it will be to stick to your dish)

We eat this with our morning fruit and yoghurt for breakfast, and I sometimes have a little bowl with some milk as a snack. It lasts for about a week in an airtight container kept on the counter (I don’t know if it lasts longer than that, because we always finish it within a week).

* Now, I’ve found the dish is important. Most recipes I found recommended using a cookie/sheet pan, and I found that dried my granola out too much, making it dry crunchy, instead of a sticky/chewy crunchy, which I prefer. So I use a ceramic baking dish for mine, but you may do as you please.
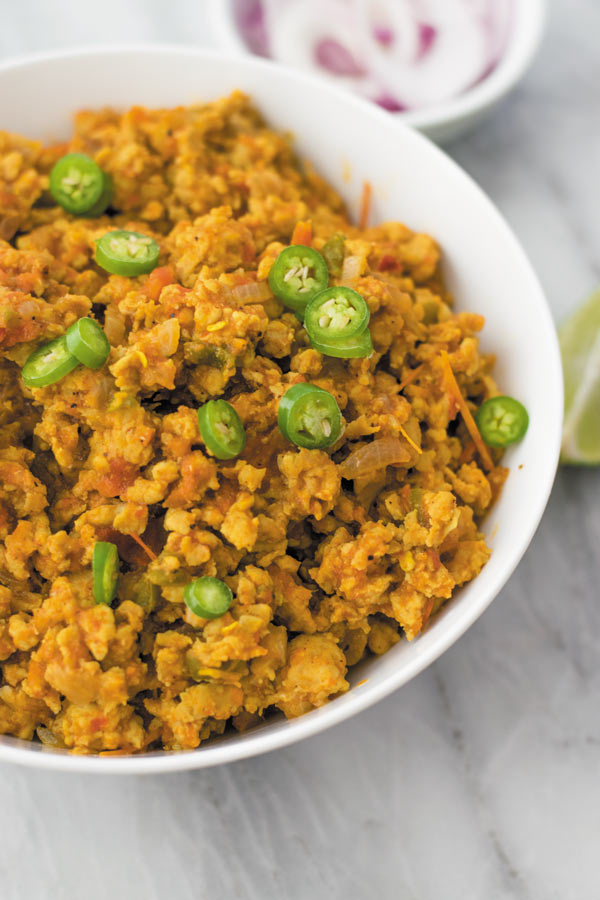
winter-warmer chicken keema (ready in 30 minutes)

I’ve already mentioned that sometimes it’s hard for me to find time (and energy) to cook, and I know that’s a common problem, because I see it on Twitter all the time. It’s hard enough when you’re a full time working woman, who is primarily responsible for coming up with food in the evening (whether you’re single or in a relationship). Throw a baby or a toddler into the mix? And it’s 100 times harder.

So I’m starting a record of quick, easy to execute dishes that are comforting for a cold winter night, but don’t take hours and hours of cooking. Even one of my go-to dishes during summer, the grain bowl, takes too long to put together when I want to eat before 8.30pm (and the toddler just WON’T LET ME GO). And I’m lucky, I work from home, so I can (sometimes) get it together to put dinner on before my boy comes home from daycare, but we aren’t all that lucky.

This was dinner last night, and it was quick, easy and tasty. Yes, I’m big into Indian flavours at the moment – spices like turmeric, cinnamon and masala make sense in winter because they are warming and tasty, but they’re also good for boosting your immune system and keeping you healthy, so it’s a win-win.

Chicken-Keema-5

Chicken Keema (or a way of using chicken mince that isn’t meatballs) – link to original recipe here, which is where I took the pic from too.

INGREDIENTS
500g chicken mince (or pork)
2 tsp oil
1 medium onion, chopped fine
2-3 green chilies, chopped fine (I used jalapeños)
1 inch piece of fresh turmeric, finely minced (optional, my addition)
1 inch piece of ginger, finely minced(optional, my addition)
1 large garlic clove, finely minced(optional, my addition)
1 tbsp ground coriander
1 tsp ground cumin
½ tsp ground turmeric
2 tsp red chili powder or chilli flakes
1 tsp garam masala
4 tomatoes, diced (I used a tin of chopped Italian tomatoes, as I had no fresh)
Salt to taste
½ tsp black pepper
2-4 tbsp Greek yoghurt (optional, my addition)
1 cup frozen peas (optional, my addition)
1 cup broccoli and cauliflower florets (optional, my addition)

INSTRUCTIONS

  1. In a large, deep frying pan, heat oil. Once warm, add onions and chilies and sauté until onion is softened. Then add in the ginger, fresh turmeric and garlic, if using, and fry until fragrant.
  2. Add chicken mince and mix. Cook on medium low heat until chicken is cooked through (chicken will turn white)
  3. Now add all the spices and stir, until the spices are integrated and slightly toasted. Then add the tomatoes, fresh or canned
  4. Cook for good 20-25 minutes or until the liquid is completely cooked off. Keep stirring it in between. Traditionally, this is a fair dry curry, more about the mince and spices than the sauce, but I wanted it to be more saucy, so once most of the tomato had cooked off, I added in a few spoonfuls of Greek yoghurt for some saucy creaminess.
  5. The original dish also entirely lacked vegetables, and I wanted some, so I tossed in some frozen peas, and sautéed some broccoli and cauliflower in a pan, then threw them in at the end. If I’d been using my brain, I’d have added frozen broccoli and cauliflower straight into the curry, which would have saved on dishes and time, so do that rather.
  6. Serve over rice or with naan.

ready-in-30 minutes red lentil dhal

{Image from Jamie’s recipe – you don’t want to see mine photographed}

So, I’ve been in a bit of a funk around cooking lately. My darling toddler has been extra clingy with me, specifically, and wants me to finish his bedtime routine off every evening. That takes 20 minutes out of my dinner making time (if we are going to eat before 9pm, and maybe, just maybe, squeeze in an hour of Masterchef!) All the normal things I make are ±45 minutes, and I’ve just not had time or been much in the mood for them.

A few weeks (or maybe months?) ago, I came across this recipe for red lentil dhal on Jamie Oliver’s site. After watching Save with Jamie last year (I also have the book), I have new respect for this guy, and my current funk persuaded me to follow the recipe (something I usually don’t do). It was amazing! Simple, quick and easy, and I’ve made it roughly once a week since that first time. It’s spiced without being spicy, though you could easily build the heat, and everyone from my lovely and fussy sister to my picky toddler loves it. It’s warm, comforting and the perfect thing to tuck into after a long day.

I have (OF COURSE) freestyled with it a bit, and I have to say, I think mine are improvements, not just tinkering for the sake of it. Make the recipe as stated in the link, but add in these things to take it to another level:

Extra ingredients:

  • 1 can coconut cream
  • 1/2 -1 tsp fenugreek
  • 1 tsp ground cumin

Optional ingredients:

  • 1 can chickpeas or 200-300g protein, like chicken breast or mini fillets
  • 1-2 diced carrots
  • 1/5 – 1 cup frozen peas

Method:

  1. When you’re cooking the lentils, I add in 2-2.5 cups of water to start*, then bring to the boil, skimming off any scum that rises to the top.
    • *My lentil cooking ratio is 1:2, so 1.5 cups lentils to 3 cups liquid, which I divide here between water and coconut cream, for a richer, tastier result.
  2. Then, when the initial liquid as cooked off and they are looking a bit dry, but not quite cooked yet, I add ± half a can of coconut cream, and cook until soft and porridgey.
  3. I never remember to buy cumin seeds, so I skip that step, and just add ground cumin to the onion/chillies mixture, along with some fenugreek, and a few lumps of asafoetida (which I picked up at Faithful to Nature ages ago, but which they don’t stock anymore). The asafoetida adds another onion-garlic flavour, and the other spices just add to the depth of flavour, instead of letting the turmeric run rampant.
  4. I cook the onion mixture at a fairly high heat for colour and caramelisation, but when it gets too dry, I splash in some more of the coconut cream.
  5. When the lentils are cooked, add them into the onion mixture, and cook until it is the desired temperature.
  6. If you are adding chicken or something that needs to be cooked, cut it into small, bite size pieces, and add it into the onion mixture, then finish cooking when you’ve integrated the lentils. If you’re adding chickpeas, just toss them in sometime towards the end, as they are cooked and will only need to be warmed through.
  7. You can also dice up some carrot, or toss some peas in, if you want to up the veggie ante, which I’ve done a few times.

Serve over basmati rice in a bowl, and eat with a spoon.

I have a problem with attaching guilt to food

So, this might be a bit of a rant, but I feel there’s a valid point to be made here, and Twitter just doesn’t have the space for me to air it.

I’m the first to admit that my relationship with food is not the healthiest. I have a long history of eating my feelings (for reference, the year we were planning our wedding and the daily cupcakes I ate as a way of ineffectively managing my stress levels). However, I’m seeing increasing references to “guilt-free” and “guilty” food from the media, bloggers, people, shops, everyone, and it concerns me. It concerns me deeply.

You see, there are two ways of approaching guilt:

  1. You imagine that eating “guilt-free” food gives you some sort of halo or immunity
  2. You imagine that eating “guilty” foods makes you some sort of demon

And neither of these approaches are healthy, to my mind at least. There’s been a huge movement towards “cutting out” food and “demonising” some food choices.

So here’s an idea:

How about we let people make their own choices about what to eat, how to eat and how to feed their families?

How about we look inwards, look at our own bodies, our own experiences with food and we let that be our guide as to what, how and how much to eat.

How about we stop looking at what other people are eating as a way of informing our choices?

What’s right for that girl on Instagram may not be right for you, and tying the negative emotion of guilt up in your food does nothing to improve your relationship with the very thing that nourishes you.

Because at the end of the day, that’s what food is. It’s been fetishised and over-analysed for so long that we’ve forgotten that the primary role of food is nourishment. Nourishment is a positive attribute. It prolongs and fosters life. It has the ability to prolong and foster relationships and friendships. And the more positive associations and relationships we have with food, the better off we’ll all find ourselves.

What I find healthy and what you find healthy may not be the same thing. I think we can all agree that we should eat more veggies, and if that manifests as veganism for you, well, that’s great. But assuming that eating “healthy whole grains and veggies” is healthy for everyone is just shortsighted. For people suffering certain dietary diseases and intolerances, the very thing you are touting as “guilt-free” and “healthy” may be just the opposite.

I can’t say it enough: what works for your body may not work for all bodies.

Your way is not the only way.

So, to end off, how about we stop attaching these negative emotions to food? How about we remember that it’s all about nourishment, and not about guilt? That would make the world a better place far quicker, at least to my mind.

Not Recipes and why I like them

I think it was Food52 who started Not Recipes. At least, that’s where I first saw the idea, and I loved it. You see, since I ‘learned’ to cook (mostly trial and error over quite a few years) I’ve been a ‘just wing it’ type of cook. I love cookbooks, I read them from cover to cover. I love looking up recipes, reading food blogs, and watching Masterchef. But I rarely follow a recipe to the T. For some reason, I simply can’t. And related to that is, I suppose, why I stopped food blogging. Do you know how hard it is to write a recipe when it’s completely counter to how you cook?

You see, the way I cook is driven by ‘Not Recipes’. I think of them as ideas for flavours that go together, little techniques and habits that form and inform the way I cook and what I make, and a mental list of successes in the past that I can build on. Occasionally, I’ll see a recipe that takes my fancy, and the first time I make it I’ll try to follow it, but usually end up substituting or changing the recipe somehow. Thereafter, I just wing it, then redo it from memory, until the outcome is how I want it to taste.

I was watching Masterchef Australia a little while ago, and in Nigella week, Nigella said something that so appealed to me, I wrote it down. She said, “you don’t feel like it, or feel like you’ll enjoy it, but the act of necessity, of having to get dinner on the table means you do it, and you enjoy it, and you get it done.” That quote might be a bit off the original, but what she was saying that it is the very act of necessity that means we do it, and in just doing it, we usually come to enjoy it.

I didn’t always love cooking. In my early 20s, when I was still learning, it was a pretty harrowing process which involved lots of packets you add water to and lots of over- and under-cooked food. Boiled chicken breasts and the mince I mistakenly added a ton of cocoa to (I had read about Mexican mole and was woefully under informed) are two of the major food lowlights of my learning days. But over time, the simple act of needing to be fed and then needing to feed other people meant that I got it done and, as I gained more confidence, I began to enjoy it.

So, while I plan to post more recipes here, you can be assured that they will probably remain badly photographed (because unless I can find a photographer/food stylist partner in crime, that ain’t gonna change), and they’ll be Not Recipes. Guidelines )that I hope you’ll have the confidence to try, but wing it where you need to) with lots of suggestions and variations. 

Because I think true enjoyment of cooking comes when your risks and trials are more successful than unsuccessful and you can have confidence in your ability to get a great meal on the table (and enjoy it).